

How To Install Window Ac Unit Youtube Toshiba
By Larry Walton, photos by Mark Walton
We don't go much rut or humidity where nosotros live merely when nosotros do, temperatures can get over 100 degrees, which makes having air conditioning a pretty good thought. Getting through those few weeks of hot weather condition can often be accomplished with a window air conditioner or two.
Being from a region where Air conditioning is not often needed, I've used lots of window air conditioners, but not often in the way they were designed. This is primarily because these units can interfere with emergency egress. Building codes rightly require that bedrooms provide an alternative escape route in case the door into the room cannot be used, and this culling escape is often through the window. Expecting children and others with physical limitations to handle an air conditioner before they can get out of the room can be disastrous.
Some of our relatives apply freestanding portable air conditioners, only these also have their drawbacks. They take upwardly room and still need to be exhausted out-side, causing window access challenges equally well.
Installing a window air conditioner in its ain glass-less window opening is a good way to handle several issues raised past window units while taking reward of their low costs and compact size.
I commonly install these units loftier on the wall so other piece of furniture tin be used below, and and then the exterior portion can be better protected by the overhang of the eaves. This is important because I leave the units in place year round. We find a few more occasions to use them throughout the twelvemonth for unseasonal hot days and even to provide a little white noise when ambient noise in the house or in the neighborhood gets a little out of spec.
Here's how I fabricated a window opening in a bedroom to be used exclusively for an air conditioner.
Pace by Step

Apply a stud finder to locate two adjacent stud trophy that volition provide enough room for the opening.

Build a jamb box of 1×half-dozen pre-primed pine nigh 4 inches wider and 4 inches taller than the air conditioner required. This allows for a replacement unit of measurement, which might be larger. Information technology also provides plenty of air apportionment around the appliance, which can become a bit tucked in depending on the thickness of the wall.

Apply a Speed Square and a torpedo level to brand sure the jamb box is both level and square while marking the out-side perimeter of the box on the wall.

Use a multi-tool to cut the drywall just outside of the pencil line. I wanted a tight fit to avert using trim on the within, but you can plan to apply trim if y'all want. Notation the shop vac hose in my left paw to take hold of most of the drywall dust.

Remove the drywall to reveal insulation and the edge of a stud.

Use a utility knife to cut the roll insulation at the top and the bottom of the drywall opening.

With the insulation removed, mark the opening corners past drilling through the exterior sheeting with a long drill fleck.

Utilize a torpedo level and framing square to lay out the opening on the outside every bit indicated by the four corner holes drilled from the inside.

The jamb box can serve as a guide to make sure the layout lines give plenty of room. (I did plan to use trim on the outside.)

Before cut the siding, drill holes large plenty for a reciprocating saw blade next to the stud and cut information technology from the interior.

I used a jigsaw to cut the siding from outside.

The section of stud came out with the piece of canvas siding.

I positioned 2×iv blocks level with the top of the cutting-off stud and nailed them into the studs on both sides of the opening for added back up.

Make sure the jamb box is flush with the exterior sheeting then nail it into identify. Paying attention to this pace makes it piece of cake to fit outside casing.
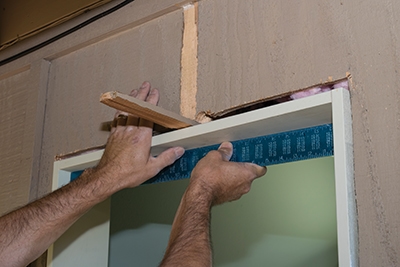
I likewise used a straight border and shims to brand sure the jamb box maintained directly lines as it was installed.

Nail through the box and shims and into the framing while making sure the box is affluent to the outside.

A hammer claw helped pry this corner out to flush as it was beingness nailed.

The multi-tool worked peachy to cut off this thick shim.

Cut out a piece of plywood starting time to the size of the opening then cut information technology to fit effectually the window air conditioner.

I used a combo square as a gauge to mark the location for the interior stops, which would hold the plywood that fills the gap between the appliance and the jamb box.

Cut and install the first fix of iii/4-by- 3/4-in. stops across the tiptop and downwardly the sides.

With the starting time set of stops in place, I put the plywood insert confronting the stops and nailed information technology into place before installing a second set of stops on the exterior.

I then cut and installed outside casing to lucifer a nearby window.
Test-fit the air conditioner before applying caulk and paint.

Caulk all of the joints to seal against weather and insects.

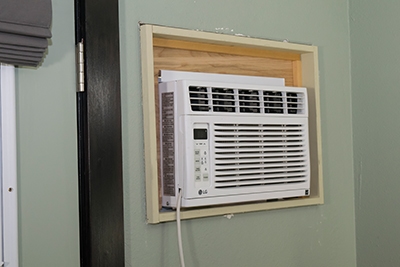
With the trim painted to match the house trim on the outside, the air conditioner looks much more planned than information technology does when sticking out of a window. This leaves windows bachelor for fresh air and emergency egress.
I painted the interior surfaces to match the blackness trim in the bedroom. Black duct tape and black foam strips included in the A/C install kit sealed the minor openings around the unit. The trim-less design of the jamb box minimizes the overall affect of the area.
Source: https://extremehowto.com/installing-a-window-ac-in-the-wall/
Posted by: ligginsrebt1940.blogspot.com
0 Response to "How To Install Window Ac Unit Youtube Toshiba"
Post a Comment